Tuesday, 27 October 2015

Christmas Sleigh decorated with Chalky Paints


Hi Antony here, for this weeks post I thought I would take a look at one of the many cartonnage kits available from Pinflair Creative Crafts. So as it's nearly Christmas I thought I would decorate the Christmas Sleigh using Viva Decor Chalky paints Christmas Collection, which are also available from Pinflair. 
Now I will be honest I can't really paint that well. So the very first time I used Chalky Paints I was a bit concerned as to how the end result would look. However I soon found out that you really don't need to be able to paint that well as the end result is meant to have that shabby, aged look. In saying that the paints are very forgiving and seem to give a great finish anyway!


So for this weeks project I shall be using the large Christmas Sleigh, Viva Decor Christmas Chalky Paints, Pinflair Bookbinding Glue or Glue-it glue, Pinflair Buff-it craft polish, Christmas themed stamps, a piece of wax from a candle, a soft wide paint brush and some sandpaper.


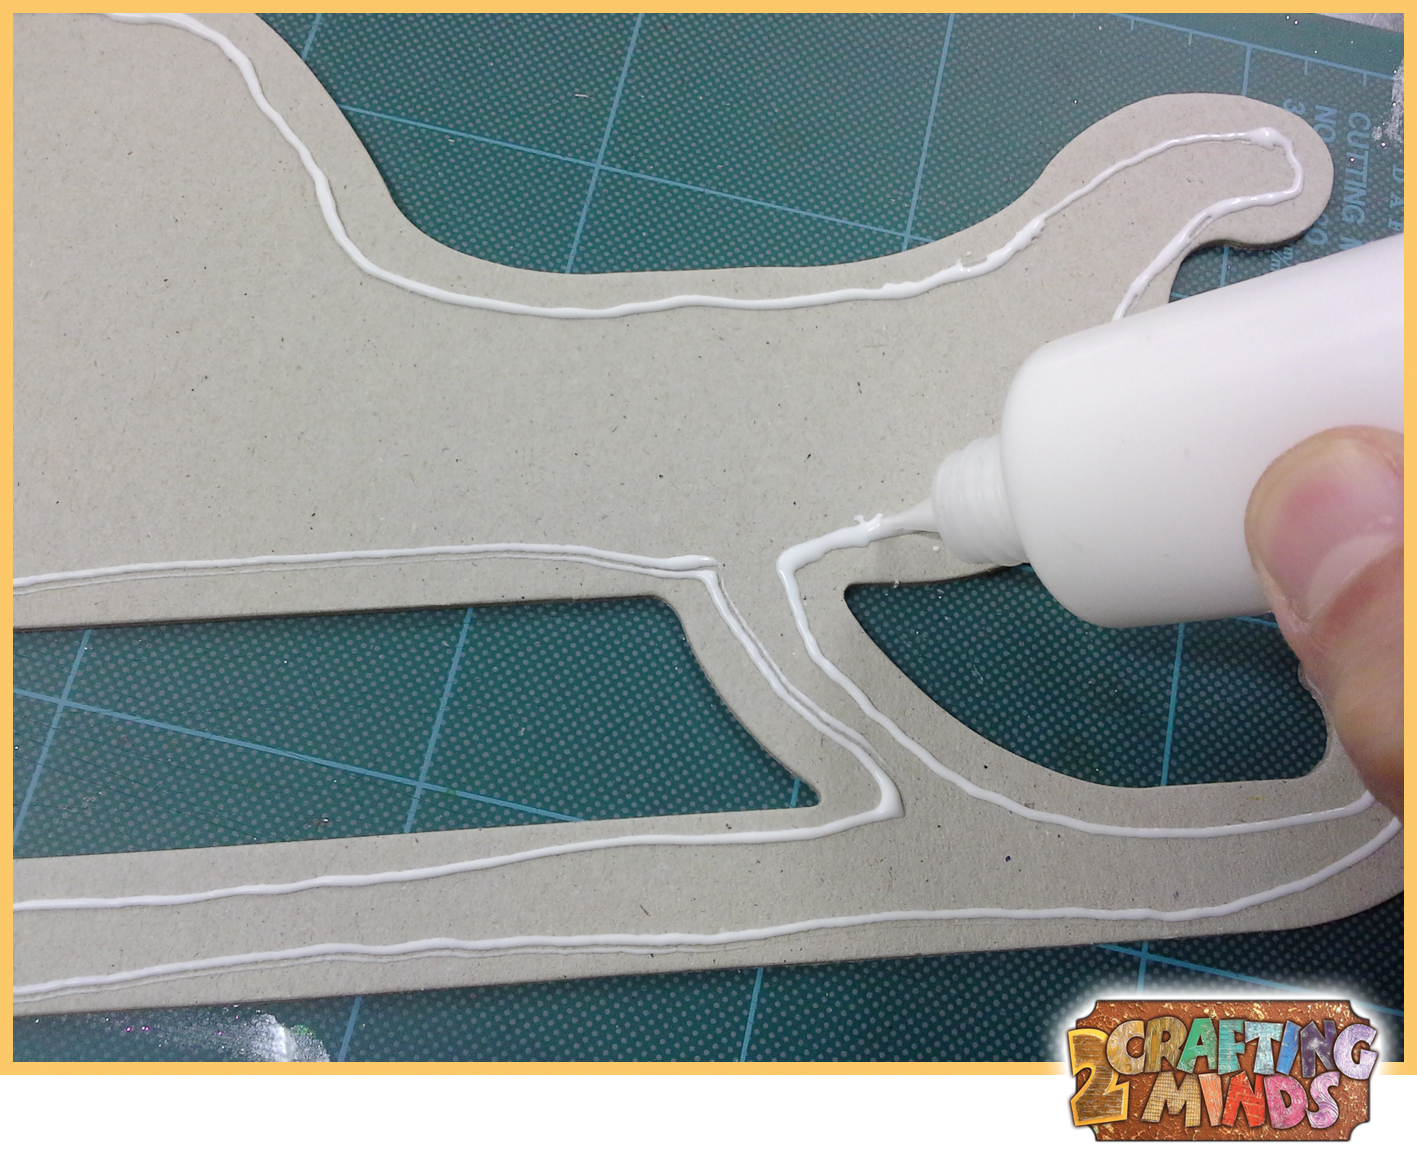
Step 1 Firstly take 2 of the main body parts to the sleigh and using Pinflair Glue-it glue stick the two parts together. You may see from the picture that I have dispensed the glue a little way in from the edge so that when I stick the 2 parts together and apply pressure very little glue squeezes out. Repeat this process again for the other side of the sleigh.


Step 2 Next I painted a thin coat of red chalky paint onto the sleighs main body, but not the sleighs runners. Only paint one side of each of the 2 sleighs. Whilst that is drying paint the other sections to the sleigh, remember only on one side.


Step 3 Once the paint has dried on the main body of the sleigh turn it over and draw round the piece of cardboard that will form the long side of the sleighs carriage. Then paint all round it, again apart from the runners.


Step 5 Now using a piece of wax from an old candle rub over the red painted area in a random fashion. Once you have rubbed the wax over the surface, rub over with a paper kitchen cloth until it is slightly shiny. This wax will act as a resist for the top coat of paint. Now give everything a second coat of paint, but this time use a different colour. In the case of this project white. Don't worry if the second coat isn't perfect, it won't matter. Leave this to dry for at least half an hour.


Step 6 Using some fine sandpaper gently sand over the all the surfaces. Sanding lightly will then reveal some of the red paint. Rub too hard and both the white and the red paint will be removed. Make sure you remove any paint dust before you move onto the next step. 


Step 7 Next I used a Christmas themed stamp and inked it up... so to speak, with blue chalky paint. Once loaded with the chalky paints I stamped over the painted surfaces. Again this can be done in a random fashion and don't worry if the stamping is not perfect... it won't matter. Place a sheet of copier paper over the sleighs runners so that you don't stamp onto them.


Step 8 If you want a really aged look you can lightly rub over the stamped areas with sandpaper too.


 Step 9 Using a very small amount of paint on a foam brush, brush round all the edges of all the shapes that you have painted. This will create a nice soft border.


Step 10 Using Pinflairs Glue-it glue start to construct the carriage. Once all stuck together paint the inside. In my project I painted it blue to co-ordinate with the stamping on the outside of the sleigh.


Step 11 I next painted the sleighs runners using Pinflair Gold Buff-it craft polish. To do this take some Buff-it out of the pot using a palette knife and put it onto a non-stick craft mat. Add a little water to the paste/polish and then using a paint brush paint the runners of the sleigh. Light brush strokes are the best and just be sure not to overload the paint brush. Leave it to fully dry for about 20 minutes and then polish with a dry kitchen cloth.


Step 12 When all of the elements are fully dry start to glue everything together using Pinflairs Glue-it glue. Ensure that when applying the glue you only put glue on one surface. That way not too much glue will squeeze out. When you glue the different pieces together ensure you hold them together for at least half a minute. The more glue you use the longer it will take to dry and ultimately stick.


Step 13 If you want you could add further embellishments from your own crafting stash such as netting ribbon, buttons or even a few die cut shapes using your festive dies!

Once you have used the Chalky Paints you will want to decorate everything in the house with them. As well as heavy duty cardboard as used in this project the paints will also work on MDF, wood and even glass. The only difference when painting glass is that you will need to clean the surface with an alcohol solution and then dab the paint on rather than brush it on. Also the drying time is a lot longer, but whatever you do, don't try to force dry it as the paint will crack!
There is one thing for sure... you will soon be hooked on using these paints!

For those of you who attended the Jo Channon Workshop/Dabble day on 1st of November 2015, here are the samples that we took there with the heart shaped back and heart button embellishments added to the sleigh.


Until next time, Happy Crafting!

Antony

Friday, 25 September 2015

SeaShell Mixed Media Canvas

Hi there Antony here... well at long last the summer holidays are finally coming to a close. I for one love to keep mementos from them. In previous years before my two sons came along my wife and myself travelled to America and collected over the years quite a collection of bits and bobs. So a few years ago I made a wooden unit with shelves, glazed it and ever since it has hung on a wall at the top of our stairs, a beautiful reminder of all the special times we had shared together. So this year rather than make a wooden unit I thought it would be nice to turn it into a mixed media project. Whilst on this years family holiday my 2 son Lucas and Hayden searched the beaches for shells, pebbles and washed up pieces of slate... oh and even more shells!

 
The products and materials I have used for this project are:- Pinflair Glue Gel, Pinflair Bookbinding Glue, Pinflair Black Decorative Paste, Pinflair die cut card shapes, Pinflair Liquid Buff-it and Craft polishes in various colours, A4 computer printer paper and some rustic string... As well as the shells, pebbles and slate!


Step 1 I firstly created the base or canvas for the project. I used 3 pieces of heavy duty cardboard measuring about 22cm square with rounded corners and stuck them all together using Pinflair Bookbinding Glue. Then using some standard A4 computer printer paper, I screwed it up and then stuck it on top of the card board using the Bookbinding Glue again. The screwed up paper created a beautiful unique base texture. I then let the glue dry for about 45 minutes.

 
Step 2 To enable all the paints to work well and stick on the shells, slates, pebbles and pieces of slate I washed them all in soapy water.


Step 3 Going back to the canvas and screwed up paper, I used a piece of sandpaper and sanded off all overhanging paper. This method of removing the overhanging paper gives a really nice clean finish and is also a lot quicker and more acurrate than using scissors or indeed a craft knife.
I then stuck together 3 heavy duty cardboard heart shapes. Next came the fun and some what difficult process of arranging the slate pieces on top of the cardboard hearts, so they looked as natural as possible, but at the same time so you could still see they formed a heart. When I was totally happy with the arrangement I glued everything in place with the legendary Pinflair Glue Gel!
Once the Glue Gel had set I used a sponge to apply Silver Buff-it craft polish to highlight the textures on the slate.


Step 4 Back to the canvas again. This time I painted the whole thing black using Pinflair Black Decorative Paste, but you could also use acrylic paint or black gesso. I used a sponge to apply the black paste, far quicker than using a paintbrush. Next was the turn for all the shells and pebbles... but not the slate pieces! The paints take quite a bit longer to dry on the shell and pebble, but you can speed up the process by using a craft heat tool.


Step 5 To add some colour to the canvas I used Pinflairs Liquid Buff-it colours using the Dry Brush Technique (see an old post for decorating a canvas bagfor more details regarding this technique) I used 3 different colours, Ice Blue, Peacock Blue and Caribbean Blue. Once the Liquid Buff-it had dried (which only takes a few minutes) I then used a sponge and lightly went over the textured surface with Pinflair Buff-it craft polish. This helped highlight the raised area of the screwed up paper texture. I used Silver, French Lavender and Blue from the Buff-it craft polish range.


Step 6 I then painted 4 large slate pieces with Caribbean Blue Liquid Buff-it and stuck them down to the canvas using Pinflair Glue Gel. I then left the Glue Gel to fully dry and then used a sponge and applied a small amount of French Lavender Buff-it craft polish to highlight the slates texture. Finally I punched 2 holes through the canvas so that I could thread some rustic string through it later for hanging purposes.


Step 7 Then I started to arrange all the blackened shells, pebbles and the slates I had arranged into the heart shape. I laid it all out dry until I was happy with the placement of everything before sticking everything into position with Glue Gel.

 
Step 8 I then left the Glue Gel to dry overnight and then the following day I started to paint all the shells and pebbles with various colour of Pinfalirs Liquid Buff-it. I painted dry on dry paint and also used the dry brush painting technique and even lightly sponged on the paint to create a beautiful mix of colours across the shells and pebbles.
When the paint had finally dried I used Silver, Copper and French Lavender Buff-it craft polishes to highlight the textures on the shells and the pebbles.
To finish off I sealed all the paint work with Buff-it Sealer. If I had only used Liquid Buff-it I wouldn't have needed to seal it. But because I used the craft polish I thought it was best to seal it, as I will most likely hang the plaque in our bathroom were moisture could ruin the finish.


I then used some rustic string and threaded it through the holes that I had punched through the canvas earlier. I knotted the ends so that you could see them from the front of the canvas for a truly rustic finish.

This type of mixed media canvas can be created from any bits and pieces you find whether it be from a holiday or everyday items from round the house, shed garage or even your garden. Give it a go... you will be addicted before you know it!

Until next time, Happy Crafting!

Antony