
Hi Antony here, for this post I thought it would be fun to try out a brand new product that should be available to buy from Pinflair Creative Crafts real soon! This wall hanging tag mixes hard lines with soft shapes and a few different material to bring it all together. I must admit when I started out I wasn't sure that it was going to turn out alright. I left it hanging up on a wall in the Pinflair shop (Hertford Craft Centre) for a week or so and had so many people comment on it (to my surprise). One lady even purchased all the products, made her own tag and showed me what she had created a week later. It's a great feeling when you can help inspire people!

So
the materials used in this post are, Pinflair Liquid Buff-it (Gold
Antique Gold and Midnight Black), Pinflair Glitter Paste (bronze),
Pinflair Buff-it craft polish (French Lavender, Green and silver),
Pinflair Bookbinding Glue, Pinflair Stencil Glue, Pinflair Glue Gel,
Viva Decor Pardo Clay, Viva Decor Ivy leaf mould and decorative button
leaf, heavy duty cord, rustic ribbon, stencils, heavy duty cardboard and
the new product that has yet to be given a name, but is a 3D structure
paste that will give you a smooth finish.

Step 1 Using a sheet of heavy duty cardboard I cut 2 identical shapes that resembled a gift tag.

Then using a stencil which I had already applied Stencil Glue to I placed it over the tag shape and press it into position. The stencil glue will hold any stencil in place whilst working with it, but won't leave any glue residue on the surface you have placed it on.

Step 2 Then using the yet to be named structure paste and a palette knife I applied it through the stencil and then removed and cleaned the stencil in water.

The drying time for this new structure paste is between 30-45mins but is dependent on the thickness of the application.

Step 3 Using some heavy duty card board I used a craft knife to cut 2 different size circles.

The larger of the 2 circles was cut so that it encompassed a stencil design... in this case the clock face with the word TIME running through it.

Step 4 Back to the tag and the now dried structure paste. Using a soft wide paint brush I painted the entire front of the tag with Pinflairs Gold Liquid Buff-it.

Next I repositioned the stencil I used with the structure paste over the top of the raised areas. Then using a sponge I lightly dabbed through the stencil using Antique Gold Liquid Buff-it. After removing the stencil I used Pinflairs Bronze colour Glitter Paste to distress round the edge of the tag.

I applied the structure paste through 2 other stencils onto the 2 heavy duty circles I cut out and then distressed them in the same way as the tag.

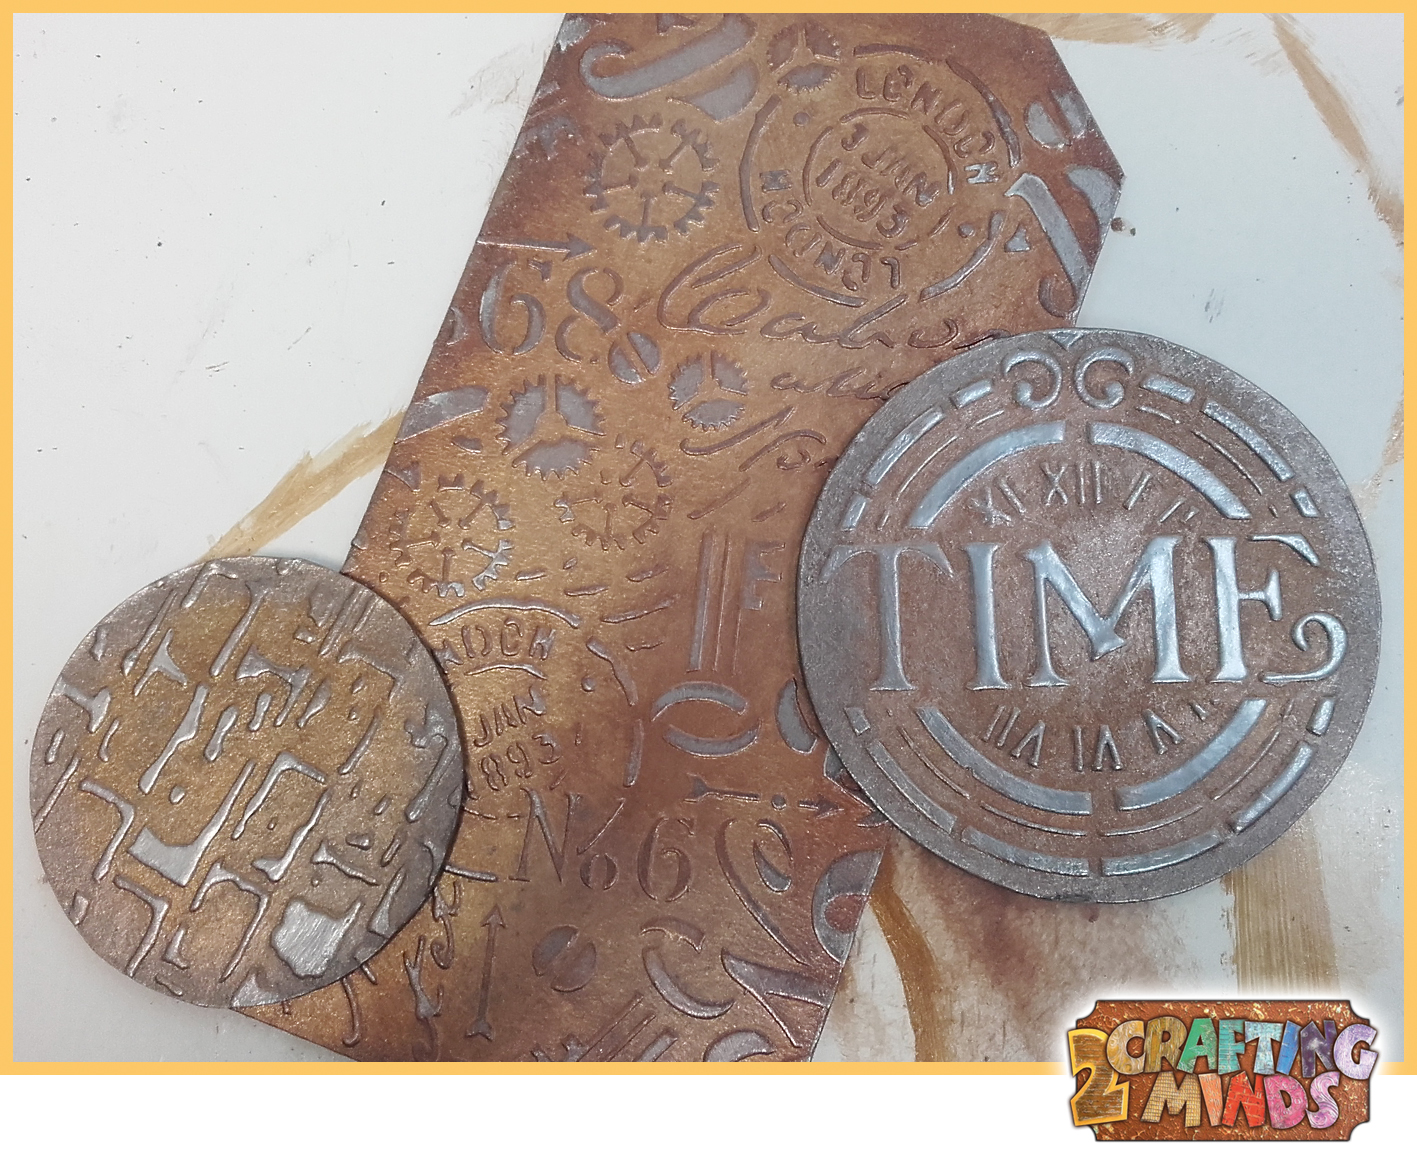
I also reapplied the stencils over the designs and used Pinflairs French Lavender and Silver Buff-it craft polish to highlight some extra detail. After removing the stencils I let it dry for about 10 minutes and then buffed it using some kitchen cloth to give it a shine.

Step 5 Using the Bronze colour Glitter Paste, I coloured the rustic ribbon and tucked it behind the tag shape and stuck it into position using Pinflair Glue Gel. To cover the back of the tag I used the other tag shape that I cut out in step 1 and stuck it using Pinflairs bookbinding glue. I held everything in place with some pegs until it was dry. Then using the Glitter paste on a sponge I covered the back of the tag and also the edges of the tag so that no bare cardboard showed anywhere.

Step 6 I
made some ivy leaves using Viva Decors Pardo Clay and Ivy leaf mould
and once baked I painted the leaves with Pinflairs Midnight Black Liquid
Buff-it. After the paint had dried i went over it lightly with Green
Buff-it craft polish and then the French Lavender colour... but not so
that all the black was covered. I also made some decorative buttons
using the Pardo clay and decorated them in the same fashion.
Next
I stuck the 2 circles into position along with an additional smaller
tag that I created as I didn't like the big empty space that was showing
on the main tag. I used Pinflair Glue Gel to stick all the ivy leaves
in place.


Step 7 Using
the Bronze colour Glitter Paste again, I coloured some heavy duty cord
and then made a hole in both the large and small tags and threaded the
cord through and tied a bow. I then lightly went over the cord with
some French Lavender colour Buff-it craft polish for a finishing touch.
Finally I created a bow using some rustic ribbon. Again, I coloured that using the Glitter paste. Once dry I stuck it onto the large tag using Pinflair Glue Gel and added a decorative button I had made on top!

If you have any questions regarding this project, just ask, myself or Samantha. We would love to hear from you.
Until next time, Happy Crafting!
Samantha and Antony